25/02/2014

Sausagemeat and Chicken Pie

Sausagemeat and Chicken Pie
sausagemeat Christmas pie
Serves 6-8

Ingredients:
1-2 tblsp olive oil
1 onion, finely chopped
400-500g sausagemeat (US: 1lb)
grated zest of a lemon
90-100g fresh breadcrumbs (US: 3-4 ounces)
85-100g chopped dried apricots (US: 3-4 ounces)
50-75g canned or pacakaged chestnuts (US: 2-3 ounces)
100g fresh or frozen cranberries (US: 4 ounces)
1 tsp dried thyme
500g boneless skinless chicken breasts (US: 1lb), 
      OR 300g leftover turkey breast (US: 3/4 lb)

500g pack of ready-made shortcrust pastry (US: 1lb)
      OR home-made pastry using 350g flour
beaten egg to glaze

Note that you will need a deep round cake tin for this pie, with diameter 20-21cm (8 inches) and a removable base, ideally a spring-form tin.

Method:
If not using ready-made pastry, prepare your pastry and leave it to rest for at least fifteen minutes or so. 

Heat your oven to 190C (375F).

Fry the onion gently in a tablespoon of oil until soft. Cool slightly, then put the onion pieces into a bowl with the sausagemeat, lemon zest, breadcrumbs, apricots, chestnuts, cranberries and thyme. Mix it roughly, using a large spoon (or your hands). You can season with a little pepper and salt if you wish. 

If using raw chicken breast, cut each of them lengthwise into two or three then pieces. Heat the rest of the oil, and fry the chicken quickly, turning, for about five minutes until lightly browned on the outside.


Roll out about two-thirds of the pastry on a floured surface making a large circle, and use it to line the deep cake tin. You should not have to grease it unless it is old and likely to stick. 


Press about half of the sausagemeat mixture into the tin, and spread it out roughly so it's level. Then add the chicken or turkey pieces in a layer on top, and cover this with the rest of the sausagemeat. Press it down lightly.

Roll out the rest of the pastry to fit the top. Brush the edges with the beaten egg, and cover the pie with the pastry lid. Pinch the edges to seal. Brush the top of the pie liberally with the egg, then if you wish, roll out the trimmings to make patterns or shapes appropriate to the season or celebration. 


Bake for about  50-60 minutes, then leave in the tin for 15 mins before placing on a large plate and carefully removing the cake tin side. Cut carefully into wedges.


Delicious served hot with a variety of vegetables, and perhaps some baked potatoes, or cold with a large salad. 

- - - - - - - - - - - - - - - - - - - - - - - - - - - - - - - - - - - - - - - -

We were introduced to this kind of raised meat pie by a friend some years ago. She told me that it was based on a BBC recipe known as Christmas pie - and, indeed, the recipe above is still quite similar to the original, although we realised that the quantities of ingredients are quite flexible and can be adjusted to suit what you happen to have available.

We usually get too much sausagemeat at Christmas, and keep one 450g pack in the freezer for a suitable occasion; I also freeze some cranberries and chestnuts. If you don't happen to like chestnuts, apricots or cranberries, just leave them out and use rather more of ingredients you do like.

For the first few times I made this, I used packaged short-crust pastry, and it worked well. However, I decided to risk my own pastry when I made it recently; I used 3/4 white flour and 1/4 wholemeal flour, to make it a little more nutritious, and it worked extremely well. This photo shows how it looked before I rolled out the lid.

Do take note of the instruction to cool the pie in the tin for at least fifteen minutes. So allow yourself time for this - it's very important. I neglected it once, trying to serve the pie about five minutes after it came out of the oven, and the pastry sides sagged, making the whole thing collapse. It tasted all right but looked a terrible mess. The pastry really does need time to firm up - and if it's a bit longer than 15 minutes, that's fine.

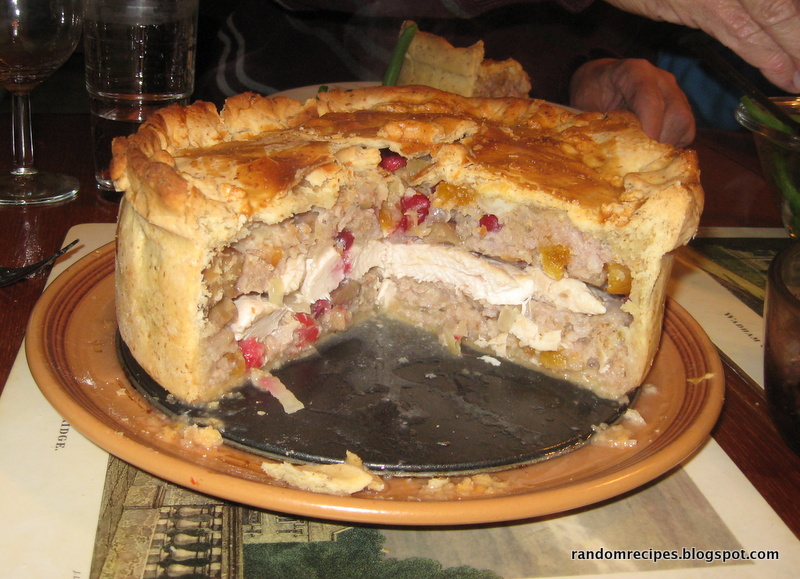
Make sure, too, that when you pinch the edges of the lid, you don't make them stick out over the edge of the tin. This is a mistake I have made at least twice. You can probably see it in this photo of my most recent effort.

It looked good... but even with a springform tin at its widest, the side piece could not be lifted over the top of the pie without breaking it. In the end, we had to sit the base on a mug and slide the side downwards, then carefully move the cake on the base to a plate for serving.

We find that there is sufficient carbohydrate in the pastry and the breadcrumbs that we just serve a variety of vegetables with it to make a filling meal for about six to eight people; however if you have hungry teenagers, you might like to bake some potatoes to go with it.

This recipe is dairy-free so long as you use dairy-free spread in your pastry. 
15/02/2014

Mincemeat cake

mincemeat cake
Mincemeat cake
Makes about 16 pieces

Ingredients:
90g wholemeal flour (US: 3 ounces, or 3/4 cup)
90g white flour (US: 3 ounces, or 3/4 cup)
1 tsp baking powder
60g butter or spread (US: 2 ounces)
90g soft brown sugar (US: 3 ounces, or 1/2 cup)
90g regular sugar (US: 3 ounces, or a little over 1/2 cup)
1 egg
4-6 tblsp mincemeat

Method:
Heat oven to 160C (320F). Grease and line a fairly deep 20cm [8 inches] round, or 18cm [7 inches] square deep cake tin.

Cream the fat and sugar with a wooden spoon or electric mixter until light, then beat in the egg, and fold in the rest of the ingredients. Add a little milk, almond milk or coconut milk if necessary to give a soft consistency, then put in the pan and smooth the top.

Bake for about 30-40 minutes. Cool for ten minutes or so before turning out onto a wire rack, and cut into wedges or squares while still warm.


- - - - - - - - - - - - - - - - - - - - - - - - - - - - - - - - - - - - - - - -

This recipe - or one approximating to it - is sometimes known as 'mincemeat brownies', but I find that rather misleading. Brownies, in my view, contain chocolate. However, this is a soft and very pleasant cake with a slighty fudgy consistency, ideal for using up leftover mincemeat after Christmas.

You can use all white flour, and all white sugar, but we prefer at least half wholemeal flour and brown sugar. If you prefer all wholemeal flour, that would produce a denser cake but it would probably still work just fine. If you have access to good quality self-raising flour, either white or wholemeal, you could use that and omit the baking powder.

If your mincemeat uses veggie suet (or no suet at all) then this cake would be suitable for vegetarians. If you use spread rather than butter and non-dairy milk, then it would be dairy-free. 

31/01/2014

Apple and pear spread (unsweetened)

apple and pear spread
Apple and pear spread
Makes about 500-600ml (2 cups)

Ingredients:
4 medium apples
4 medium pears
juice of ½ lemon
½ tsp cinnamon
¼ tsp ground ginger
½ tsp vanilla extract

Method:
Peel, core and chop the fruit roughly. Put in a pan with a little water. Cover, and simmer gently until it is very pulpy. 

Cool for half an hour or so, then blend - with a stick blender if possible. Add the lemon juice, spices and extract, then simmer, stirring, until thick. Cool and keep the spread in covered containers in the fridge or freezer. It will keep for about a week or more in the fridge, several months in the freezer. 


- - - - - - - - - - - - - - - - - - - - - - - - - - - - - - - - - - - - - - - -

This is a good alternative to jam, for spreading on bread or toast. Even if you use fairly tart apples such as Granny Smith, the sweetness of the pears counteract this, and the cinnamon provides sufficient taste that the lack of added sweetener is not obvious. You can experiment with different spices if you wish.

Note too that the quantities of fruit are approximate - use more or fewer as you wish.

However, since there is nothing to preserve this spread, it will not keep very long at room temperature, and only for about a week in the fridge.  I tend to decant it into small plastic containers, as in the photo above, each holding about 200ml, and freeze them until needed.

24/01/2014

Apple Bundt Cake

Apple bundt cake
apple bundt cake
Makes 1 cake to serve 10-12

Ingredients:
3 medium apples
2 tblsp soft brown sugar
1-2 tsp cinnamon

375g plain or part wholewheat flour (US: 3 cups)
3 tsp baking powder
400g sugar (US: 2 cups)
250ml olive oil (US: 1 cup)
1 tsp vanilla extract
166ml orange juice (US: 2/3 cup)

Method:
Heat the oven to 175C (350F). Grease and flour a ring or bundt pan with about 25cm (10 inch) diameter.

Peel, core and chop the apples into thin slices, then place in a bowl with the soft brown sugar and cinnamon. Leave for flavours to blend.

Meanwhile, in another (large) bowl, beat the eggs and sugar with an electric whisk. Slowly beat in the oil, vanilla extract and orange juice. When blended, fold in the flour and baking powder carefully using a metal spoon.

Pour about half of the batter into the prepared ring tin, then place the apples on top to cover. Top with the rest of the batter.

Bake for about an hour, then cool for a while in the tin before turning out carefully onto a wire rack. 


- - - - - - - - - - - - - - - - - - - - - - - - - - - - - - - - - - - - - - - -

A bundt cake is technically baked in a ring mould with sloping sides. It's not something in our culture - but just over a year ago we re-watched the DVD of 'My Big Fat Greek Wedding' with some friends, and started discussing bundt cakes afterwards. We had a loose-bottomed ring cake tin, about 25cm across, so a couple of days later I hunted around online and found various recipes.

The one that looked simplest - and which used apples, of which I had several - was for a Dutch apple bundt. I decided that I did not need as much sugar as listed to sprinkle on my apples and that soft brown sugar would be much nicer than regular white sugar. I reduced the cinnamon, since to our British tastebuds many American recipes have too much of this spice, and I also reduced the vanilla extract since most cakes use just one teaspoon.

apple bundt cake with flowersThe original recipe called for 'all purpose' flour, but I always like to use at least half wholewheat flour. It might be possible to use entirely wholewheat. Freshly squeezed orange juice is of course the best kind, but in the UK many people buy orange juice in packets, and since it just provides necessary liquid and a little flavour, any kind could probably be used. Or even apple juice, for those who want to avoid citrus products.

I found the most difficult part of this recipe was turning the cake out, as it stuck to the inside of the ring despite the greasing and flouring. It felt quite fragile so I was worried that it might break, but it was fine. We ate it with our friends, who provided a little spray of flowers as a nod to the film!

17/01/2014

Keema

Keema
Keema
Makes about 6-8 servings

Ingredients:
1-2 tablespoons olive oil
2 medium onions, finely chopped
6-8 cloves garlic, crushed
2 tablespoons garam masala
2 teaspoons turmeric
2 teaspoons ground ginger
2 teaspoons cumin seeds
1 teaspoon cinnamon
1/2 - 1 teaspoon chili powder
1/2 - 1 teaspoon salt
750-800g minced beef (US: about a pound and three-quarters)
800g canned or frozen tomatoes (US: about 28 ounces)
140-150g tomato puree (US: about half a cup)
300ml stock or water (or leftover wine)

Optional:
100g red lentils, rinsed
200g chickpeas, cooked; or frozen peas


Method
Cook the onions and garlic in a large saucepan in the olive oil until well softened. Add all the spices, and stir for about a minute, then add the mince and continue cooking and stirring, mixing into the onions, until it starts to brown.

If using lentils, stir them in at this stage.

Add the rest of the ingredients and keep stirring until it reaches the boil. 


At this stage you can transfer it to a crockpot and simmer for 4-6 hours on 'medium'; alternatively, cover and simmer gently for about an hour, stirring occasionally to ensure that it does not burn.

Adjust seasonings if necessary, and serve over rice or baked potatoes, with a large salad or cooked vegetables.

Chickpeas or frozen peas can be added towards the end of the cooking, for authenticity.


- - - - - - - - - - - - - - - - - - - - - - - - - - - - - - - - - - - - - - - -

Keema is a traditional South Asian dish made of mince, often with added potatoes or peas. There are a variety of different ways of seasoning this, so feel free to adjust the spices according to taste. My original recipe only used garam masala, ginger and cumin; I make it a policy to add turmeric to anything like this, due to its health properties, and when I tasted it during cooking, I felt it lacked much 'kick', so I added the chili powder. Some chili powder is much stronger than other forms, so be careful with this.

There still seemed to be something missing, so I added some cinnamon, and it felt just right. However, different people like different spice combinations, so it's worth experimenting. Equally, if you can't stand one of the spices listed, or don't have it in your cupboard, you can leave it out.

Some recipes for keema include 200g yogurt, stirred in at the end; this will add a bit of taste, but obviously makes it unsuitable for dairy-free eaters.

11/07/2012

Coconut milk from desiccated (dried) coconut

Coconut Milk
coconut milk
Makes a litre of coconut milk

Ingredients:
100g desiccated coconut
500ml hot water
500-600ml lukewarm water

You will also need a food processor or blender, a sieve and a muslin square or fine-meshed tea-towel for straining.

How to make the coconut milk:
A few weeks ago, I made (and created a photo-guide for) some coconut mik from a fresh coconut. It was very good indeed, but it was a great deal of effort and decidedly not something I wanted to do regularly.

So I thought I would try using desiccated (dried) coconut, since most of the recipes I had found online assured me that it could be used in a similar fashion. I've had one or two people ask me exactly what desiccated coconut is and where to buy it - so here's a photo of one of the types available in Cyprus. It comes in packs of about 180g or 200g, and costs around 60-70c for 100g.

I experimented with various quantities, based on recipes I found elsewhere, and since I like to keep things easy, I opted for 100g coconut, which I weigh directly into my blender, or a tall jug if using a stick blender. Unlike almond milk, the coconut 'soak' water is used for making coconut milk.

For those who don't have metric kitchen scales, 100g is about 3.5 ounces. If necessary, if you want to use a measure, check the weight on the packet, see how many cups of coconut it produces, and do a little arithmetic. Different kinds of desiccated coconut seem to take up different amounts of space, so it's impossible to state an exact cup measurement.

I put the coconut in a pyrex jug or bowl, then I add about 400ml hot water - heated in the kettle or microwave, but not quite boiling. It should be sufficient to cover the coconut to allow it to soak. If your blender is made of pyrex or other heatproof material, you can soak the coconut in that, but mine is plastic which is not supposed to have very hot things in it. 

All that took a great deal of typing, but in practice it's about half a minute to get to this stage - perhaps a little longer if you include heating the water.

Leave the coconut soaking for around 20 minutes; it doesn't matter if it's somewhat longer. But don't leave it for more than about a couple of hours. 

After the coconut has soaked, I tip it into the blender, and usually add another 100-150ml or so of lukewarm water to rinse out the jug or bowl. Then I use the blender (covered, of course), for about a minute at high speed.  If you are using a stick blender, you may need to blend for longer, starting at low speed.

The extra water makes it sufficiently liquid that it should blend nicely; if you're so inclined, you can watch the clumps of coconut fall down into the centre to twirl around in the blender. If it seems a bit solid and isn't mixing well, stop the motor for a moment and add a little more water.


sieve covered with muslin for coconut milkWhile the blender is running, I get out my wide-necked two-litre jug and a suitable fairly fine sieve (strainer) that fits well over the top. I use the kind intended for sieving flour, but almost anything will do. Cover the sieve, sitting on the jug, as evenly as you can with a muslin square.


When the blender has run for around a minute, switch off, then tip the contents over the sieve into the muslin. If your sieve is too small, you may need to do this in two parts but it's quicker, obviously, to do it all at once.

I use a plastic spatula to help the coconut mixture out of the blender, but if there's a lot stuck to the sides, I may use another 50ml or so of water to rinse it around and then pour that over the muslin too.

So far, the entire process has taken maybe two minutes (excluding the soaking, where you can go away and do something else).


Now comes the part that can be a bit messy. You have to knead the coconut in the bag to extract the 'milk'. If you do this too enthusiastically, it can squirt in all directions. So be warned.

What I do is to gather up the corners so that the coconut is caught inside, then slightly twist the top together, and push down into the sieve. That way, most of the coconut milk will go straight into the jug.


After you've pushed and kneaded for a few seconds, and got most of the milk out, you can pick up the bag (making sure that the coconut itself doesn't escape) and then squeeze and knead in your hands; but, again, be careful to aim downwards as far as you can.


By this stage you should have about 500-600ml in your jug; it's hard to extract the liquid entirely.

When I first did this, I put the dry-ish coconut meal back in the blender and repeated the process. But it was very messy. I no longer recommend this but you can try it if you like.

What I do instead is to pour some more hot (but not quite boiling) water carefully over the coconut meal, which will help to extract more of the milk. Then pour a little cold water over that, estimating amounts; you want to make the resultant liquid up to a litre. The cold water is simply to make it possible to repeat the 'milking' process as shown above without burning your fingers!

Push down again, after gathering the top up, then knead, and squeeze; if you like you can also twist the top around tightly to force more milk out. Keep going until you reach the 1000ml (1 litre) mark on your jug.

If you don't have markings on the side of your jug, just guess. Or decant the milk into another jug which does have measurements on it. If you're in the USA, a litre is approximately the same as a quart (ignore that if you're anywhere else in the world, where a quart is 40 fluid ounces rather than 32, and thus rather more than a litre).

And there you have it: one litre of coconut milk. It tastes much the same as when it's made with fresh coconut milk, is less expensive, and considerably less effort. At most five minutes of work.

I usually put mine into a nicer jug (such as the one shown at the top of the recipe) which pours more easily before refrigerating. It keeps in the fridge for at least three or four days, but we get through ours in about two and a half days.

If you remember, it's a good idea to stir it as it cools, otherwise some fairly solid 'cream' will float to the top and set. You then have to break it in order to use the milk. However it doesn't matter, and quickly melts when used in coffee or to make curry.

04/07/2012

Basic part wholewheat bread

Basic Bread for the Breadmaker
Makes one medium loaf

Ingredients:
3/4 tsp olive oil (or other oil)
3/4 tsp molasses (or honey or treacle... can be omitted entirely)
260 ml lukewarm water (or part milk, or almond milk, or stock...)

200g wholemeal bread flour
100g regular wholewheat flour (or more bread flour)
75g regular white flour (or strong white flour)
3/4 tsp salt
1 heaped tsp dried instant style yeast

2 tblsp flax and sunflower seeds (optional)

Method:
For breadmaking machines:
Place the ingredients in the pan in the order given. If the temperature in your kitchen is particularly cold, it's worth warming the water or other liquid used, but don't get it too hot or the yeast won't work.

I then use the white setting on my breadmaker, as I find that although the majority of the flour is wholewheat, the wholegrain setting tends to make it too dense for our tastes. Add the seeds, if used when the machine bleeps - or if you have a seed dispenser, put them in that.

When done, cool on a wire rack.


For baking by hand:
Place the first three ingredients in a large bowl, ensuring the water is hand hot, then gradually add the flour, mixing in well each time. If you have a food processor with a dough attachment, you can use that. Keep mixing until all the flour is added, then add the salt and yeast.

Knead the dough thoroughly for ten minutes or so, then leave to rise in a warm place, covered with a cloth to keep insects away. After it has doubled in size - this may take up to an hour - punch it down, then shape it and place in a suitable sized bread pan (it should take up approximately half the depth at this stage) or on a baking tray. Leave to rise again for about 20-30 minutes until doubled in size again, then place in an oven (NOT pre-heated) set to 200C. Cook for about 30-40 minutes, or until it looks done and has a slightly crusty top.

Cool slightly in the tin then turn out on a wire rack.


- - - - - - - - - - - - - - - - - - - - - - - - - - - - - - - - - - - - - - - -

Note for those in the US: one cup of flour is approximately 100-120g flour. So 75g flour is about 3/4 cup, or a little more. A cup also holds about 260ml water or other liquid. If you are measuring rather than weighing ingredients, the results are a little more inaccurate - so keep an eye on the dough during the first kneading; if it seems to dry, add a touch more water. If too fluid, add a little more flour.

General notes: I developed this recipe for my Morphy Richards Cooltouch breadmaker, which lasted me for six and a half years. I have recommended it to other people with different machines, and recently tried it on a brand new Carrefour breadmaker with two paddles (hence the loaf-shaped bread in the picture) although I generally double the ingredients to make a larger family-sized loaf.

This recipe (or mild variations on the theme) has rarely let me down. You can add some herbs or garlic at the beginning if you wish, or chopped nuts rather than seeds. If you change the kind of flour, do make sure that at least 200g is 'strong' flour intended for breadmaking, rather than the all-purpose or cake varieties.

The reason I tend to use water as the main liquid is that it's the least expensive! I used to use half milk, or half almond milk when some of my family went dairy-free; then I discovered that it tasted almost exactly the same with just water. However if you want extra protein, some kind of milk works fine. Just make sure you warm it a little before using.

When my Morphy Richards machine stopped working part-way through its final loaf, it had completed the kneading stage, so it was a simple matter to leave the dough to rise in the machine, then punch it down by hand and put it in a baking tin for the second rise. I then baked it in the oven, and it turned out just fine.


Newest recipe

Beetroot salad

Ingredients: 250g cooked beetroot (NOT in vinegar) 50g walnuts  50g raisins 2 garlic cloves, crushed 1 tblsp mayonnaise 1 tblsp vegan yogurt...