06/08/2015

Peach and tomato salad with feta

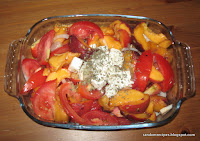
peach and tomato salad with feta cheese and onions
Serves: 2-4

Ingredients:
1 small onion, thinly sliced
250g tomatoes
250g ripe peaches
1 tblsp olive oil
1 tblsp lemon juice
1 tblsp honey
30g feta cheese
salt and pepper
dried (or fresh) basil to garnish

Method:
Wash the tomatoes and peaches, and cut them into wedges, placing them in a serving dish with the thinly sliced onion pieces.

Mix the olive oil, lemon juice and honey, and pour over, tossing the main ingredients until coated and well-mixed. Add salt and pepper to taste.

Chop the feta cheese into small chunks, and place in the middle, then sprinkle with basil.

Serve immediately.

- - - - - - - - - - - - - - - - - - - - - - - - - - - - - - - - - - - - - - - -

I knew I had several peaches in the fridge, which weren't going to last much longer. I'd frozen lots of them, and wondered idly if I could use them as part of a salad. A quick online search led me to a recipe entitled Summer peach and tomato salad which sounded ideal, since I also had a couple of biggish tomatoes, and plenty of onions. I didn't have red onions, as the recipe suggested, but that didn't worry me. 

Since my onions were large, I only used a half one, cutting very thin slices and then cutting those again. I was seriously dubious about mixing onions with peaches but I've learned, over the years, that the most unusual of combinations can work. Maybe. 

I actually included about 300g peaches, using up the ripest ones. The original recipe talked about a specific kind of tomatoes, and asked for both beefy ones AND cherry ones. I simply had two ordinary tomatoes so used those. 

I nearly always use lemon juice rather than vinegar, as I prefer it and it's more nutritious, and I misread the teaspoon of honey as a tablespoon... but I put it together, and tried it cautiously. It was absolutely delicious! Quite sweet, but the tartness of the feta offset that perfectly. We had a lettuce salad with it, and some other vegetable chunks, but we kept going back for more of this. The onion gave a crunchiness and extra flavour that somehow enhanced it. 

I'm sure it would serve four people if it were part of a big meal,  but two of us nearly finished it by ourselves. This is one we are definitely going to repeat, so long as peaches are in season. 
20/07/2015

Chocolate chip cookie cake

vegan chocolate chip cake made with chickpeas and aquafaba
Makes one 18cm (7 inch) cake

Ingredients:
250g cooked chickpeas
150g soft brown sugar
50g oats
2 tblsp apple sauce OR aquafaba
1.5 tblsp olive oil OR coconut oil
1 tsp baking powder
0.5 tsp vanilla extract
0.25 tsp salt
0.25 tsp bicarbonate of soda

85g dairy-free dark chocolate chips

2 tsp cocoa powder and water to mix (optional)

Method:
Drain the chickpeas, whether home-cooked or canned, reserving the cooking water (also known as aquafaba) if you plan to use it in this recipe or elsewhere.

Put the chickpeas in a food processor and set to high speed for about thirty seconds, until the consistency is approximately that of hummus. You can use a stick blender to puree them more at this stage, if you wish, adding the apple sauce or aquafaba to make it slightly less dry.

Add all the other ingredients except the chocolate chips to the food processor, and use a low or medium speed to blend them well together.

Stir in the chocolate chips, then place in an 18cm (7 inch) greased and/or lined cake tin, preferably one with a loose base. If you want a more chocolatey centre section, put about three-quarters of the mixture in the tin, pushing it to the edges. Then mix cocoa powder in a small bowl with a little cold water, until it forms a slightly runny paste, and stir that into the remaining mixture. Place it in the middle of the tin, then smooth the top so it's even.

Cook for about 25-30 minutes at 180C until the top is firm but still pliable. Leave to cool in the tin.

- - - - - - - - - - - - - - - - - - - - - - - - - - - - - - - - - - - - - - - -

I had never heard of a chocolate chip cookie cake (or, indeed pie), although apparently they're well-known in the US. Traditional ones, it seems, have a pastry crust, and contain flour, butter and eggs rather than chickpeas, oil and apple sauce. They are highly calorific, and not suitable for vegans, nor for those who are gluten-free or dairy-free.

I first came across the wheat-free vegan variation, called 'deep dish cookie pie' on the 'chocolate covered Katie' blog. It sounded wonderful, but also huge. I didn't have a 10-inch (25cm) deep cake tin, either. So I did a rough calculation and decided that my convenient 18cm pan would be about right for half the quantity. That's the amount given, converted from cups to metric weights, above.

My first attempt didn't look much like the mouth-watering photos on Katie's blog, but it tasted very good. And was even better on the second day. To our way of thinking it was more a cake than a pie; pies, by my definition, contain some form of pastry. But that's merely semantics.

So I decided to try making the full recipe (ie double my version) for my second attempt, dividing it between two 18cm pans, to share with some friends. Since I’d soaked and cooked some chickpeas the day before, I decided to use aquafaba rather than apple sauce, as I didn’t want to have to cook an apple on a hot day to produce just a couple of tablespoons of apple sauce. It worked perfectly.

mixture for chickpea chocolate chip cake, in food processor

My food processor is fairly basic and it was difficult to get the chickpeas to a puree. The first time I used my stick blender as well, as suggested above, but the second time I didn't bother as it made a lot of extra mess.

It was fine from my perspective, and for those of us who like chickpeas; we couldn't taste them, but there was a hint of chickpea texture here and there. Those who don't like chickpeas may find that disturbing and prefer them more thoroughly blended.

choc chip cookie pie with chickpeas, baked and in the pan, showing chocolate centre
I started wondering about adding cocoa powder to one of them, then decided to make a smaller chocolate section in the centre of each.  I weighed about 400g of the mixture into each of the tins, smoothing it out and hollowing the centre slightly, then I mixed cocoa powder with water to form a paste, and stirred that into the rest.

It didn't look particularly pretty, but it worked well. It still doesn't look like the recipe I've adapted, but the taste is still amazingly good, with a fudgy texture ... and we think it's even better when it's been refrigerated overnight.

Important note: if you're vegan or strictly dairy-free, you will need to check the ingredients in the chocolate chips to ensure that you can eat them. Many dark chocolate chips are free of dairy products, but some of them contain traces of milk. If you are coeliac, check the baking powder too, as some brands can contain small amounts of gluten. 

13/07/2015

Chickpea and Mushroom Risotto

Showing the chickpea and mushroom risotto cooking, with peas
Serves: 4-5

Ingredients:
1 tblsp olive oil
1 large onion, thinly sliced
4 garlic cloves, minced or crushed
200-250g mushrooms, sliced
200-250g rice
1 tblsp turmeric
80-100ml white wine (optional)
600-800ml vegetarian stock
260-300g cooked chickpeas (or one 400g can)
1 tblsp dried parsley
1/2 tsp salt
1 cup frozen peas (optional)

Method:
Heat the oil in a large frying pan, then cook the onion slices, stirring occasionally, for eight to ten minutes or until they are just starting to turn brown. Add the garlic and stir in, then add the mushroom slices, and cook for another three or four minutes; by this stage the mushrooms should be nicely caramelised.

Add the rice and turmeric and stir well until the rice is completely coated in oil, then add the wine (if used) or about 100ml water, and simmer, stirring lightly, until the liquid has been absorbed.

Gradually add the stock, about 200ml at a time, stirring over a medium heat until it's absorbed; if the pan starts to overflow, transfer some of the mixture to another pan.  Keep adding the stock gradually and stirring until the rice is tender but not too soft. Use extra water, if necessary.

When the rice is at your preferred consistency, add the drained chickpeas and salt and stir in for a couple of minutes; then add the frozen peas, if used, and the parsley, and stir until the peas are just thawed, then serve immediately.

- - - - - - - - - - - - - - - - - - - - - - - - - - - - - - - - - - - - - - - -

I was looking for recipes that use chickpeas, and came across one labelled 'Risotto with caramelized onions, mushrooms and chickpeas' on another recipe blog. It sounded good, though it didn't say how many people it would serve, and I made it pretty much as the recipe stated, other than using my favourite brown basmati rice rather than risotto rice. Perhaps that means that it wasn't, technically, a risotto.  But never mind.

I used less stock than the recipe suggested, which surprised me, as I had assumed that brown rice would absorb more liquid. I also added extra garlic, as I usually do, and turmeric because it's a health food and I use it wherever I can. Rather than mixed herbs, I used parsley.

It was good, and I served it with lightly fried courgettes and home-made ketchup, and it made about four or five portions.

gently frying onions, garlic and mushrooms
Since I freeze chickpeas in can-sized portions, I decided to use a whole portion rather than just a cup, the second time I made this. I also decided to use a large onion and rather more mushrooms than the original recipe listed.

Since I felt it rather lacked colour the first time, I put the frozen peas in as a last-minute addition, and it worked so well that I decided to keep them in.  However, I managed to forget the turmeric, which is why the photos don't look yellow.

The amount I made the first time was about four portions, but with the extra mushrooms, chickpeas and frozen peas, we found that the recipe above is sufficient for five portions; that makes it relatively low-carbohydrate, as we would normally expect about 70-80g rice (1/3 US cup) per person if served with curry.

I always serve separate vegetables with any cooked meal; this is good with courgettes and broad beans, and also with a dash of home-made tomato ketchup

07/07/2015

Aquafaba

chickpeas and aquafaba
Makes about 1 litre

Ingredients:
About 500g/1lb chickpeas (US: garbanzo beans)
Water to soak, and more water to cook


Method:
Soak chickpeas in a large pan overnight. Make sure there is plenty of water and room to expand.

In the morning, drain them well, rinse, and drain again.

Then cover the chickpeas with fresh cold water, adding sufficient that there is at least a couple of centimetres of water above the level of the soaked chickpeas.  If it's very close to the top of the pan, you might want to transfer it all to a larger one, or else split between two pans.

Cover, and bring to the boil over the stove. Turn down the heat and simmer gently for around an hour, checking occasionally to make sure there's plenty of water. Top up with extra if necessary.

After an hour, turn the heat off but leave the chickpeas in the pan so that they continue cooking without using energy, and gradually cool down.

After a few more hours, drain the chickpeas over a large container. Do NOT discard this cooking water. This is aquafaba, a vegan substitute for egg white (or in some cases egg) which can be whipped and used for sorbets, meringues or mousses. It can also be used, as it is, to glaze pastries, or in a variety of other recipes.

- - - - - - - - - - - - - - - - - - - - - - - - - - - - - - - - - - - - - - - -

I'm not usually what my sons call an 'early adopter'. I'm slow to jump on band-wagons, and suspicious about trying new products. However, although we're not vegans, we all like chickpeas as an inexpensive and delicious form of protein. I make chickpea curry regularly, and humus, and chickpea burgers, and was idly looking for some other recipes for this legume when I came across a link that led me, eventually, to a Facebook group about vegan meringue.

I wondered at first if it was some kind of hoax, but the more I read, the more intrigued I became. Here's the official aquafaba page. It's not marketed commercially, although no doubt someone will do so eventually... but it's very easy to make, as shown above. If you don't have the time to soak and cook chickpeas, then (I'm told) you can simply drain the brine from a can of chickpeas, and it should work just as well even though it may have a bit of salt or other additives in it.

chickpeas in containers for the freezer
I usually cook chickpeas in bulk - half a kilogram or so at a time - and freeze them in can-sized portions. So, despite feeling dubious, I decided I had nothing to lose if I kept the cooking liquid and tried to whip it.

I felt a little foolish as I drained and measured the fluid into a litre jug, as shown in the picture at the top. I put the cooled chickpeas into plastic containers, as shown here, with about 260-270g in each, and froze them.

So far, so good.

Then I put some of the aquafaba - about half a cup, I suppose - into another pyrex bowl, and used my electric hand mixer to beat it. I started slowly, as the group recommended (not wanting it to splatter) and gradually increased it.

Showing aquafaba being whipped into stiff peaks, like egg whites

To my astonishment, it worked. The yellowy gungy liquid turned white and bubbly within about a minute, and within two or three more minutes, it had expanded almost to the top of the bowl, exactly like egg white does when whipped, and had become thick, leaving a trail.

I then had to decide what to do with it - I honestly hadn't believed it would work so well!  With that first batch, I added some sugar to make meringues, then I added some melted dark chocolate to more of it to make chocolate mousse.

I whipped some more, after that, excited at the possibilities; I then folded in some thawed frozen raspberries cooked with a little sugar, and made raspberry sorbet.  All were delicious, and didn't taste at all of chickpeas or anything unusual.

I'm delighted to have found a product that can be used in place of raw egg, and hope to use it in future in royal icing, and peppermint creams.  Since my initial experiment I've also made chocolate sorbet, glazed pastry with it, and tried it in an ordinary cake.

Experts have discovered that one can produce twice as much aquafaba by covering the drained chickpeas with more fresh water, then refrigerating for 24 hours, and mixing the resultant liquid with the cooking water. However, I've found that I have plenty. We don't eat that many desserts or sweet foods, and I've already frozen several small amounts of aquafaba for future use. It keeps for about five or six days in the fridge; probably for several months in a freezer.

A few caveats:
1. Others have had success using the fluid from canned or home-cooked beans, such as pinto beans and black beans. I've tried, but could not get the liquid to whip. So I'm going to stick with the chickpea brine which, so far, has been very successful.

2. Aquafaba is very sensitive to fat of any kind.  The bowl and beaters must be scrupulously clean and free of any trace of grease, or it won't work. I've found that plastic bowls don't make good containers for whipping; since I use my plastic bowls to make cakes, I can only assume that there's some ingrained grease despite my dishwasher. Those who have regular success with aquafaba use either pyrex or metal dishes, or very hard plastic such as that of a food processor bowl.

3. Although it starts to whip within a minute or two, it can take six or seven minutes or more to become stiff enough to use. If you're making meringues, it needs to be very thick with peaks that don't fall, and that takes longer still. So I would not recommend trying this with a non-electric mixer. It's hard enough on the arms to use a hand electric one. On the other hand, a stand mixer is harder to adjust, and it's important to 'feel' the right amount of power to use at each stage.


04/07/2015

Slow cooked pinto bean curry

crockpot curried pinto beans
Serves 8-10

Ingredients:
400-500g dried pinto beans, plus soaking/cooking water

1 tblsp olive oil
2 onions
4-5 garlic cloves
2 bell peppers
1/2 tsp crushed chili flakes
1 tsp cumin seeds
1 tsp turmeric
1 tsp ginger
3 tsp curry powder or garam masala
1/2 tsp salt

1-2 tblsp soft brown sugar
140-180g tomato puree or paste
1 400ml can coconut milk

Method: 
soaked and cooked pinto beans in the crockpot
Soak the pinto beans in a large pan overnight, with plenty of water to cover.

Drain well, then fill the pan with water to about 2cm above the beans. Bring to the boil and simmer on a low heat, covered, for about 45 minutes. Turn the heat off but leave the pan covered for another hour or two so that it continues cooking.

Drain the beans (keeping the cooking water if you plan to use it elsewhere) and put the beans in the crockpot.

Now slice or chop the onions, and sauté them in a large frying pan for 5-10 minutes. While they're cooking, chop the peppers into smallish pieces, and peel the garlic cloves. When the onions are soft and starting to caramelise, crush the garlic cloves into the mixture, and add the pepper pieces; stir for a minute or two, then add the cumin seeds and chili flakes and stir again to release the flavour.

Add the other spices, salt and brown sugar, stirring all the time, then add the tomato paste or puree, rinsing the can or packet out, if necessary, with some of the coconut milk.

Stir well, then pour over the beans in the crockpot. Pour the rest of the coconut milk into the pan, and stir well to release anything that's stuck to the bottom of the pan, and then pour that over the mixture in the slow cooker too.

Stir briefly with a large metal spoon to combine; if it seems too dry, add a bit more water, or some of the bean cooking liquid to the coconut milk can and pour over.  Put the lid on, and cook on 'medium' for about six to eight hours, or rather longer on 'low'.

Serve with rice or naan, chopped cucumber, mango chutney and other side dishes as preferred.

- - - - - - - - - - - - - - - - - - - - - - - - - - - - - - - - - - - - - - - -
I found the basis for this recipes in Lent 2014 when our family experimented with vegetarian eating. Searching online for bean-based crockpot ideas, I came across something called 'Crock pot coconut curry baked beans.' I was a little dubious, but determined to try a variety of recipes, and I very much like pinto beans.

The only change I made when I first tried it was to substitute dried ginger for the recommended minced fresh ginger, and, as usual, to put in more garlic than suggested. Oh, and full-fat coconut milk. It was delicious! The combination of tomato puree, coconut milk and a little brown sugar make the most amazing sauce, and even my omnivore husband liked it. 

The second time I made it, I added in turmeric, since it's currently considered a super-food, and used garam masala as I didn't have any curry powder. We liked it just as much, but being a bit more picky, I felt that it lacked texture. In addition, I like having at least one or two types of vegetable in a curry, as well as the protein. I had some red peppers that needed to be used up, so I added them, and that made it (in our view) perfect. In the batch I photographed, I happened to have orange peppers so I used those. 

Spices can, of course, be adjusted to taste, and you could use canned pinto beans if you run out of time to soak and pre-boil dried ones. This isn't a particularly hot curry, but if you prefer more of a 'bite', you could add more ginger and/or chili flakes.

Different slow cookers have different settings and I find that the 'low' setting on mine doesn't really cook at all, so I tend to use 'medium'. However, some slow cookers only have two temperature settings. If that's the case, I'd recommend using 'low'. 

Chocolate fudge cake