29/03/2014

Crunchy egg and cabbage flan

Crunchy egg and cabbage flan
crunchy egg flan
Serves 4-5

Ingredients:
Base:
100g breadcrumbs
100g wholewheat flour
100g oats
30g flaxseeds
150g butter or spread, melted

Topping:
3 tblsp olive oil
1 large onion, finely chopped
200-300g cabbage, shredded
200g mushrooms, sliced
salt and pepper
50g butter or spread
4 eggs

Method:
Heat oven to 190C (375F).

Mix the dry ingredients for the base together in a bowl, and stir in the melted fat. Mix to combine, then press into a greased flan dish (pyrex, ceramic or metal), around 25-28cm in diameter. Press down well using the back of a large spoon, or a potato masher, then bake in the hot oven for about 15 minutes. Cool slightly.

To make the filling, soften the onions in the oil in a deep pan over a medium heat, then add the shredded cabbage and stirfry until it is hot but still crunchy. Add the mushrooms, and season with salt and pepper to taste, then place a lid on the pan and keep warm.

Melt the remaining butter or spread in another pan and break the eggs in. Beat with a fork or wire whisk as if making scrambled eggs, then as they form solid curds tip into the vegetable mixture and stir quickly.

Pile into the cooked base, and serve hot, with other cooked vegetables and perhaps some baked potatoes, or cool and then chill, to serve cold with salad.

- - - - - - - - - - - - - - - - - - - - - - - - - - - - - - - - - - - - - - - -

base of crunchy flan
I found this recipe in a book I bought, inexpensively, many years ago, called 'Vegetarian Cooking For Children' by Rosamond Richardson. After deciding to become vegetarian during Lent, I was looking for something a bit different from bean curries and lentil chilis, and came across a recipe called 'Elegant egg flan'.

We thought the base - shown prior to cooking in this photo - was excellent, although I decided immediately to increase the amounts; the recipe in the book claimed to serve four, and to fit a 20cm flan dish, but I was not doing any potatoes so I used the amounts as shown here and it worked well.

The original recipe didn't have any onion, but I thought it needed some, so included that; I cooked the onion until it was just starting to go brown, but should have added the cabbage sooner, as it was still really quite crunchy. I was a bit dubious about the egg, but it worked well and made a meal that was decidedly different from anything I had made before, and just as good cold the following day as it was hot, served with some baked tomatoes and roasted carrots, and also some good dollops of home-made tomato ketchup.


14/03/2014

Hummus

Hummus
home made hummus
Makes about two cups

Ingredients:
1 cup chickpeas, soaked overnight (or one 400ml can)
2 medium cloves garlic, crushed
2 tblsp tahini
2 tblsp lemon juice
2-4 tblsp olive oil

Method:
If using dried chickpeas, rinse them well. Cover them in plenty of fresh water in a large pan, bring to the boil, and simmer for about an hour until soft. 

Whether cooking yourself or using a can, strain the chickpeas, reserving the liquid. 

Blend the chickpeas in a liquidiser (blender) with the other ingredients, adding about half a cup of the chickpea cooking water, or more if necessary until you have a smooth, spreadable consistency which is still quite thick. 

Scrape out into a suitable container, and keep in the refrigerator. 

- - - - - - - - - - - - - - - - - - - - - - - - - - - - - - - - - - - - - - - -

Hummus is originally a Middle Eastern spread, but is also extremely popular in Cyprus. Tahini, a paste made of sesame seeds, is widely and inexpensively available from supermarkets and fruit shops, and keeps for a long time even after opening. Chickpeas are an excellent form of protein, and are known as garbanzo beans in the United States.

I always used to cook them from the dried product, and still do when using chickpeas in curries or other main dishes. But we've found that the canned ones make a much smoother hummus; keeping a can of chickpeas in my kitchen cupboard also means that I can whizz up a batch of hummus in five minutes rather than having to plan ahead to soak overnight and then cook before using.

While hummus can be bought, it often contains extra preservatives, and we like this home-made version considerably better. The amount of lemon juice and garlic can be adjusted to suit personal tastes. My original recipe asked for the juice of a large lemon, and we found that made it far too lemony for our tastes. We find that the juice of half a small lemon is about right; since lemons vary so much in size, I've adjusted it to a couple of tablespoons, which is our preference.

You can add a bit of paprika, or cayenne (if you prefer it to be spicy), or caramelise a chopped onion and add that. If you add oregano, basil and a couple of tablespoons of tomato paste, you have what some people call pizza-flavoured hummus.

Hummus is often used as a dip, with carrot sticks, cucumber pieces and pieces of pitta bread, or can be spread on bread and eaten with salad. I use mine in baked potatoes rather than using butter or a spread.

Note that the drained cooking water, whether from a can or from cooking chickpeas yourself, is known as aquafaba. It can be whipped like egg whites, and used in many ways. 

07/03/2014

Chili non carne

Chili non carne
chili non carne
Serves 6-8

Ingredients:
2 tblsp olive oil
3 medium onions, peeled and chopped
6 cloves garlic, peeled and crushed
2 medium bell peppers, chopped
2 tsp cumin seeds
2 tsp turmeric
1/4 - 1/2 tsp chili powder
300g spinach, fresh or frozen
800g chopped tomatoes (fresh, frozen or canned)
2 courgettes, chopped (optional)
3 tblsp tomato puree or ketchup
100ml water, veggie stock or wine
400g pinto beans, cooked or canned

Method:
Cook the chopped onion in the oil in a large pan, for about five minutes, stirring once or twice, until well-softened. Add the garlic and peppers, and cook, stirring, for a couple more minutes. Stir in the spices, then add all the other ingredients, apart from the beans. Bring to the boil, cover, then simmer gently for about fifteen minutes or until the liquid is reduced.

Add the beans and cook for another 10-15 minutes.


- - - - - - - - - - - - - - - - - - - - - - - - - - - - - - - - - - - - - - - -

Although we prefer to have lentils in chili - whether with or without meat - we were entertaining a vegetarian guest who likes beans but not lentils.  I adapted this recipe from one I found online, which had carrots in it, but no spinach. When I made it recently, I had no carrots, to my surprise, so I added spinach instead, and we felt that it was much better.

I use dried beans  -  either pinto beans, or a mixture of pinto and black-eye, and soak half a panful the night before. I then rinse and boil them for an hour or so in the morning, and weigh out roughly 400g when I need them. I freeze the rest in 200g portions for other meals. Using canned beans is simpler, but more expensive. Any kind of beans would work.

The spices can be adjusted to suit tastes - be careful with the chili powder, which can vary enormously in potency. We prefer just a hint of chili, but if you like it strong, add a bit more. The original recipe used oregano, and did not have any turmeric, but I use the latter wherever possible.

We served this over brown rice, with broccoli as an extra vegetable. You could serve yogurt or grated cheese with it, if you eat dairy products.

01/03/2014

Almond milk, step by step

Almond milk
almond milk

Makes 1 litre 

Ingredients:
80-100g almonds
approx 1 litre water

extra water for soaking and rinsing


Method:
1. Put the almonds in a suitable container and soak in cold water in the fridge for several hours, or overnight. The quantity of almonds used depends on how much you like the flavour; it's quite mild, so if you like almonds, the full 100g gives quite a creamy milk. We have found that reducing this to 80g works just as well, and the almond flavour is less pronounced.


2. Drain the water away through a small sieve, rinse the almonds, and drain again. Place the almonds in a food processor or blender, (shown in the photo above) and blend for about 30-40 seconds, until the pieces are finely ground, as in the photo at the side.

Do not over-process or you may end up with almond butter.


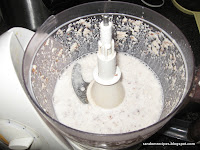
3. Pour about 200ml cold water onto the ground almonds, then process for about 40-50 seconds on high. The 'milk' will be extracted into the water as you do this, so that when you take the lid off you will see something like this photo.

The sides of the food processor or blender will be rather spattered with pieces of almond, so scrape them into the milk, using a little more cold water if needed.


4. Pour the milk and pulp into a sieve over a measuring jug, then pour another 100ml or so of water over, and push down gently with a spatula or large spoon, to push out more of the milk.

Return the pulp to the food processor, then repeat stage 3; the second stage of processing will produce slightly more watery almond milk, but it's well worth doing this extra processing. Strain again; at this point you can use a muslin bag or square, if you want, to squeeze out the last of the milk, but I tend just to stick with the sieve and push out as much as I can with a spatula.

Keep drizzling water over the almonds and straining remaining milk through until there's about a litre of almond milk in the jug. Then cover, and refrigerate.

- - - - - - - - - - - - - - - - - - - - - - - - - - - - - - - - - - - - - - - -

Some years ago, two members of my family realised that dairy products were causing their ears to block up. In addition, we realised that most cows' milk is highly processed and homogenised. We experimented with various kinds of home-made milk substitutes; living in Cyprus, it's very expensive to buy them pre-packaged.

For adding to coffee, and for using in cooking anything sweet or connected with curries, we like coconut milk the best. But our son much prefers almond milk on granola, and we also find that it works better in savoury foods such as quiche or yorkshire puddings. So we usually have both available.

The pulp can be refrigerated for several days, or frozen for a few months. We use it when making granola, or added to a bowl of granola when eating it. It makes a good substitute for ground almonds in any recipe that uses them, such as Christmas cake, or can be added to bread, to digestive biscuit bases of cheesecakes, or even to pastry.


Chocolate fudge cake